How To Select Printable Area In Excel
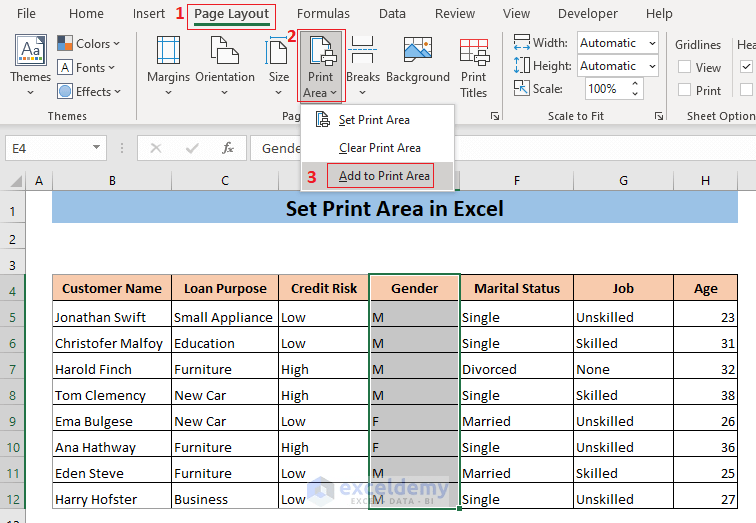
How To Select Printable Area In Excel - First, select the cells which you want to set as the print area. I’ll also walk you through. To set multiple print areas, hold down the ctrl key and click the areas you want to print. After that, go to print layout > print. Web the print area button in the page setup block of the page layout tab is the default tool for setting a print area in excel. Highlight a cell range you want to print exclusively on the paper. Choose set print area. to set multiple print areas in your sheet, hold ctrl. Each print area prints on its own page. Web the easiest way to set the print area is by selecting the print area option from the page layout tab. Web in short, you have to navigate to “ page layout ” > “ page setup ” > “ print area ” > “ set print area.”.
How to Set Print Area in Excel (5 Methods) ExcelDemy
Each print area prints on its own page. I’ll also walk you through. First, select the cells which you want to set as the print area. Web the easiest way to set the print area is by selecting the print area option from the page layout tab. After that, go to print layout > print.

How to Set the Print Area in Excel (Step by Step) YouTube
I’ll also walk you through. Web in short, you have to navigate to “ page layout ” > “ page setup ” > “ print area ” > “ set print area.”. In this article, i’ll show you how to set the print area for microsoft excel. To set multiple print areas, hold down the ctrl key and click the.

Select Printable Area Excel
Web in short, you have to navigate to “ page layout ” > “ page setup ” > “ print area ” > “ set print area.”. In this article, i’ll show you how to set the print area for microsoft excel. Web the easiest way to set the print area is by selecting the print area option from the.
:max_bytes(150000):strip_icc()/ExcelSetPrintArea-5c23d199c9e77c0001adc722.jpg)
How To Select Printable Area In Excel
Web in short, you have to navigate to “ page layout ” > “ page setup ” > “ print area ” > “ set print area.”. I’ll also walk you through. After that, go to print layout > print. Highlight a cell range you want to print exclusively on the paper. Each print area prints on its own page.

How to Clear a Print Area in Excel for Office 365 Support Your Tech
Each print area prints on its own page. In this article, i’ll show you how to set the print area for microsoft excel. After that, go to print layout > print. I’ll also walk you through. Web the print area button in the page setup block of the page layout tab is the default tool for setting a print area.

How to Set Print Area in Excel (5 Methods) ExcelDemy
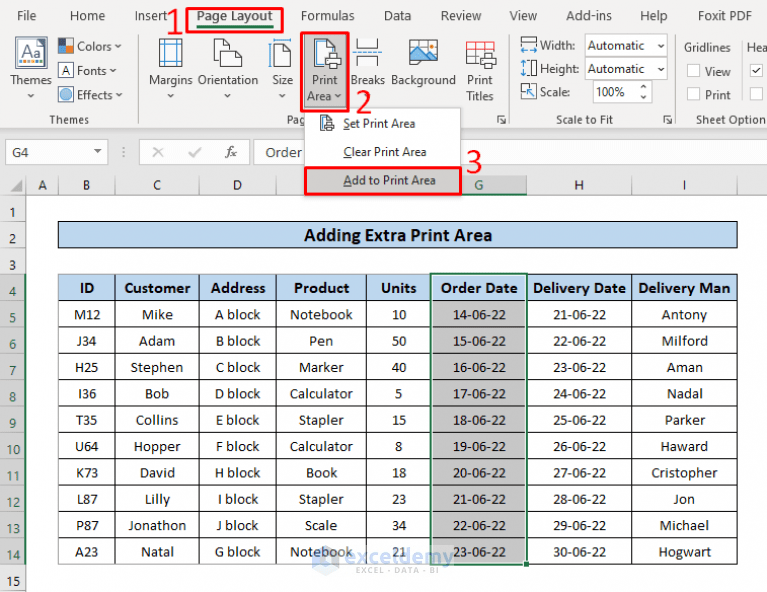
To set multiple print areas, hold down the ctrl key and click the areas you want to print. Each print area prints on its own page. Web the easiest way to set the print area is by selecting the print area option from the page layout tab. Web to set a single print area, select the cells. Web in short,.

How to Select Print Area in Excel YouTube
After that, go to print layout > print. First, select the cells which you want to set as the print area. Highlight a cell range you want to print exclusively on the paper. In this article, i’ll show you how to set the print area for microsoft excel. Web the easiest way to set the print area is by selecting.

How To Select Printable Area In Excel
Choose set print area. to set multiple print areas in your sheet, hold ctrl. Web on the worksheet, select the cells that you want to define as the print area. Web in short, you have to navigate to “ page layout ” > “ page setup ” > “ print area ” > “ set print area.”. Web to set.

How to Print Selected Area in Excel on One Page (3 Methods)
Web on the worksheet, select the cells that you want to define as the print area. Web to set a single print area, select the cells. After that, go to print layout > print. I’ll also walk you through. First, select the cells which you want to set as the print area.
How to Set Print Area with Blue Line in Excel (5 Easy Ways)
Web on the worksheet, select the cells that you want to define as the print area. Choose set print area. to set multiple print areas in your sheet, hold ctrl. Web to set a single print area, select the cells. First, select the cells which you want to set as the print area. To set multiple print areas, hold down.
Web on the worksheet, select the cells that you want to define as the print area. Highlight a cell range you want to print exclusively on the paper. In this article, i’ll show you how to set the print area for microsoft excel. Web in short, you have to navigate to “ page layout ” > “ page setup ” > “ print area ” > “ set print area.”. I’ll also walk you through. Each print area prints on its own page. To set multiple print areas, hold down the ctrl key and click the areas you want to print. Web to set a single print area, select the cells. Choose set print area. to set multiple print areas in your sheet, hold ctrl. After that, go to print layout > print. Web the easiest way to set the print area is by selecting the print area option from the page layout tab. First, select the cells which you want to set as the print area. Web the print area button in the page setup block of the page layout tab is the default tool for setting a print area in excel.
In This Article, I’ll Show You How To Set The Print Area For Microsoft Excel.
Web the easiest way to set the print area is by selecting the print area option from the page layout tab. Choose set print area. to set multiple print areas in your sheet, hold ctrl. First, select the cells which you want to set as the print area. Highlight a cell range you want to print exclusively on the paper.
Each Print Area Prints On Its Own Page.
To set multiple print areas, hold down the ctrl key and click the areas you want to print. Web in short, you have to navigate to “ page layout ” > “ page setup ” > “ print area ” > “ set print area.”. After that, go to print layout > print. Web on the worksheet, select the cells that you want to define as the print area.
Web To Set A Single Print Area, Select The Cells.
I’ll also walk you through. Web the print area button in the page setup block of the page layout tab is the default tool for setting a print area in excel.